文章
EtherCAT Slave stack Linux installation 快速指南
解压缩 EtherCAT_SlaveStack_Obj_1_3_15.tgz
拷贝 EtherCAT_SlaveStack_Obj_1_3_15.tgz 至 home 目录, 使用下面的命令做解压缩,
tar -xv -f ~/EtherCAT_SlaveStack_Obj_1_3_15.tgz
解压缩成功后,在 home 目录下会生成 EtherCAT_SlaveStack_Obj 目录
bobtu@bobtu-500-351cn:~$ ll EtherCAT_SlaveStack_Obj
total 32
drwxr-xr-x  7 bobtu bobtu 4096  3月  1 13:24 ./
drwxr-x--- 17 bobtu bobtu 4096  3月  1 13:54 ../
drwxr-xr-x  2 bobtu bobtu 4096  3月  1 13:54 apps/
drwxr-xr-x  4 bobtu bobtu 4096  3月 22  2022 bin/
drwxr-xr-x  3 bobtu bobtu 4096  3月 22  2022 build/
drwxr-xr-x  2 bobtu bobtu 4096  3月 22  2022 documents/
drwxr-xr-x  2 bobtu bobtu 4096  3月 22  2022 include/
-rw-r--r--  1 bobtu bobtu 2609 12月  2  2021 README
安装 slave library libess.so.1.3.15 至 /usr/local/lib/ 目录
依次执行如下命令。
sudo install -v -g root -o root -m u=rwx,g=rx,o=rx ~/EtherCAT_SlaveStack_Obj/bin/linux64/libess.so.1.3.15 /usr/local/lib/
cd /usr/local/lib/
sudo ldconfig -v -n /usr/local/lib/
sudo ln -sfv libess.so.1 libess.so
查看 /usr/local/lib/ 目录,会出现如下内容。
bobtu@bobtu-500-351cn:~$ ll /usr/local/lib/
total 136
drwxr-xr-x  3 root root  4096  3月  1 13:41 ./
drwxr-xr-x 10 root root  4096  2月 21 03:22 ../
lrwxrwxrwx  1 root root    11  3月  1 13:41 libess.so -> libess.so.1*
lrwxrwxrwx  1 root root    16  3月  1 13:40 libess.so.1 -> libess.so.1.3.15*
-rwxr-xr-x  1 root root 72280  3月  1 13:39 libess.so.1.3.15*
将 libess.so 载入系统
依次执行如下命令。
sudo sh -c "echo /usr/local/lib/ >> /etc/ld.so.conf"
sudo ldconfig
查看是否成功载入系统,执行如下命令,应该会出现相应的libess的内容。
bobtu@bobtu-500-351cn:~$ ldconfig -p | grep libess
        libess.so.1 (libc6,x86-64) => /usr/local/lib/libess.so.1
        libess.so (libc6,x86-64) => /usr/local/lib/libess.so
安装头文件至 /usr/local/include 目录
执行如下命令,并查看是否安装成功。
sudo install -v -g root -o root -m u=rw,g=r,o=r ~/EtherCAT_SlaveStack_Obj/include/*.h /usr/local/include/
bobtu@bobtu-500-351cn:~$ ll /usr/local/include/
total 244
drwxr-xr-x  2 root root  4096  3月  1 13:45 ./
drwxr-xr-x 10 root root  4096  2月 21 03:22 ../
-rw-r--r--  1 root root 67422  3月  1 13:45 ecatDefs.h
-rw-r--r--  1 root root 13803  3月  1 13:45 essConfig.h
-rw-r--r--  1 root root 17660  3月  1 13:45 ess.h
-rw-r--r--  1 root root  4546  3月  1 13:45 essSystem.h
-rw-r--r--  1 root root 30152  3月  1 13:45 essTypes.h
编译 complex.c 文件
执行如下命令,用来编译和生成应用程序 complex ,如能编译成功,则说明上述的 libess.so 和头文件的安装成功。
cd ~/EtherCAT_SlaveStack_Obj/apps/
gcc -o complex complex.c -less
执行 complex,如能正常执行,则说明上述的 libess.so 成功载入系统。若 esd EtherCAT Slave board ECS-PCIe/FPGA 的 kernel driver 安装成功的话,执行 complex 会看到如下内容。
bobtu@bobtu-500-351cn:~/Documents/ess_workspace$ sudo ./complex
[sudo] password for bobtu:
[Application] Entering SCHED_FIFO mode... with priority 90
[Application] New scheduler policy is SCHED_FIFO, priority is 90
[Application] App  : esd Slave Sample (complex.c, built: Mar 20 2024 10:09:10)
[Application] Stack: ess Version 1.3.15, built at Mar 22 2022 16:11:50 (64 bit)
[Application] Trying to open all devices... (CFG_ESS_MAX_DEVICES = 1)
[Application] dev[0] Driver: esd PCIe EtherCAT Slave Driver, uio, Version 2.2.5, ECS-xMC/FPGA
FPGA V2.0.2 (built at 2017-12-21 11:02:23), PIO: HW=0 Feat=0x01 I/O=0xffff/0xffff
[Application] dev[0] Product Name: ECS-PCIe/FPGA
[Application] dev[0] Order No.: E.1106.02
[Application] dev[0] Serial No.: 0x31000131
[Application] dev[0] HW Version: 0x00000000
[Application] dev[0] HW Features: 0x00000001
[Application] dev[0] Temperature: 27.0 deg. C
[Application] Stop local output update...
[Application] Stop ESC In/Out process data update...
[Application] IOCTL detected SerialNo: slaveSerial changed to 0x31000131
[Application] ESD HW detected: (ProdCode/DeveName) 0x0000000e / "ECS-PCIe/FPGA"
[Application] ESD HW detected: (HW Version) 0 "0"
[Application] dev[0] Starting application ...
[Application] ---> Transition from Init (0x01) to Init (0x01):
[Application] ---> New state will be Init (0x01)
[Application] Stop local output update...
[Application] Stop ESC In/Out process data update...
[Application] ---> Transition from Init (0x01) to PreOp (0x02):
[Application] ---> New state will be PreOp (0x02)
[Application] ---> Transition from PreOp (0x02) to Init (0x01):
[Application] ---> New state will be Init (0x01)
[Application] Stop local output update...
[Application] Stop ESC In/Out process data update...
[Application] ---> Transition from Init (0x01) to Init (0x01):
[Application] ---> New state will be Init (0x01)
[Application] Stop local output update...
[Application] Stop ESC In/Out process data update...
[Application] ---> Transition from Init (0x01) to PreOp (0x02):
[Application] ---> New state will be PreOp (0x02)
[Application] +++ CoE event REQUESTED_DOWNLOAD (2) for object 0x1c12.00 +++
[Application] +++ CoE event STARTING_DOWNLOAD (4) for object 0x1c12.00 +++
[Application] +++ CoE event COMPLETED_DOWNLOAD (6) for object 0x1c12.00 +++
[Application] +++ CoE event REQUESTED_DOWNLOAD (2) for object 0x1c12.01 +++
[Application] +++ CoE event STARTING_DOWNLOAD (4) for object 0x1c12.01 +++
[Application] +++ CoE event COMPLETED_DOWNLOAD (6) for object 0x1c12.01 +++
[Application] +++ CoE event REQUESTED_DOWNLOAD (2) for object 0x1c12.00 +++
[Application] +++ CoE event STARTING_DOWNLOAD (4) for object 0x1c12.00 +++
[Application] +++ CoE event COMPLETED_DOWNLOAD (6) for object 0x1c12.00 +++
[Application] +++ CoE event REQUESTED_DOWNLOAD (2) for object 0x1c13.00 +++
[Application] +++ CoE event STARTING_DOWNLOAD (4) for object 0x1c13.00 +++
[Application] +++ CoE event COMPLETED_DOWNLOAD (6) for object 0x1c13.00 +++
[Application] +++ CoE event REQUESTED_DOWNLOAD (2) for object 0x1c13.01 +++
[Application] +++ CoE event STARTING_DOWNLOAD (4) for object 0x1c13.01 +++
[Application] +++ CoE event COMPLETED_DOWNLOAD (6) for object 0x1c13.01 +++
[Application] +++ CoE event REQUESTED_DOWNLOAD (2) for object 0x1c13.00 +++
[Application] +++ CoE event STARTING_DOWNLOAD (4) for object 0x1c13.00 +++
[Application] +++ CoE event COMPLETED_DOWNLOAD (6) for object 0x1c13.00 +++
[Application] ---> Transition from PreOp (0x02) to SafeOp (0x04):
[Application] 1 PDOs assigned to SM3
[Application]     1 entries in 0x1a00
[Application]         Obj 0x2010.00, 32 bit
[Application] ---> New state will be SafeOp (0x04)
[Application] Start ESC In/Out process data update...
[Application] *** Initialized input1/2/3 to 1000/100000/5
[Application] *** Set input1/2/3 to 1001/100010/10
[Application] ---> Transition from SafeOp (0x04) to Op (0x08):
[Application] 1 PDOs assigned to SM2
[Application]     1 entries in 0x1600
[Application]         Obj 0x2000.00, 32 bit
[Application] ---> New state will be Op (0x08)
[Application] Start local output update...
[Application] *** Set input1/2/3 to 1002/100020/20
[Application] *** Set input1/2/3 to 1003/100030/40
[Application] *** Set input1/2/3 to 1004/100040/80
[Application] *** Set input1/2/3 to 1005/100050/160
[Application] *** Set input1/2/3 to 1006/100060/64
[Application] *** Set input1/2/3 to 1007/100070/128
[Application] *** Set input1/2/3 to 1008/100080/0
[Application] *** Set input1/2/3 to 1009/100090/5
[Application] *** Set input1/2/3 to 1010/100100/10
[Application] *** Set input1/2/3 to 1011/100110/20
[Application] *** Set input1/2/3 to 1012/100120/40
[Application] *** Set input1/2/3 to 1013/100130/80
[Application] *** Set input1/2/3 to 1014/100140/160
[Application] *** Set input1/2/3 to 1015/100150/64
[Application] *** Set input1/2/3 to 1016/100160/128
[Application] *** Set input1/2/3 to 1017/100170/0
[Application] *** Set input1/2/3 to 1018/100180/5
[Application] *** Set input1/2/3 to 1019/100190/10
[Application] *** Set input1/2/3 to 1020/100200/20
[Application] *** Set input1/2/3 to 1021/100210/40
[Application] *** Set input1/2/3 to 1022/100220/80
[Application] *** Set input1/2/3 to 1023/100230/160
[Application] *** Set input1/2/3 to 1024/100240/64
[Application] *** Set input1/2/3 to 1025/100250/128
[Application] *** Set input1/2/3 to 1026/100260/0
[Application] *** Set input1/2/3 to 1027/100270/5
[Application] *** Set input1/2/3 to 1028/100280/10
[Application] *** Set input1/2/3 to 1029/100290/20
[Application] *** Set input1/2/3 to 1030/100300/40
[Application] *** Set input1/2/3 to 1031/100310/80
[Application] *** Set input1/2/3 to 1032/100320/160
[Application] *** Set input1/2/3 to 1033/100330/64
[Application] *** Set input1/2/3 to 1034/100340/128
[Application] *** Set input1/2/3 to 1035/100350/0
[Application] *** Set input1/2/3 to 1036/100360/5
[Application] *** Set input1/2/3 to 1037/100370/10
[Application] *** Set input1/2/3 to 1038/100380/20
[Application] *** Set input1/2/3 to 1039/100390/40
[Application] *** Set input1/2/3 to 1040/100400/80
[Application] *** Set input1/2/3 to 1041/100410/160
[Application] *** Set input1/2/3 to 1042/100420/64
[Application] *** Set input1/2/3 to 1043/100430/128
[Application] *** Set input1/2/3 to 1044/100440/0
[Application] *** Set input1/2/3 to 1045/100450/5
[Application] *** Set input1/2/3 to 1046/100460/10
[Application] *** Set input1/2/3 to 1047/100470/20
[Application] *** Set input1/2/3 to 1048/100480/40
[Application] *** Set input1/2/3 to 1049/100490/80
[Application] *** Set input1/2/3 to 1050/100500/160
[Application] *** Set input1/2/3 to 1051/100510/64
[Application] *** Set input1/2/3 to 1052/100520/128
[Application] *** Set input1/2/3 to 1053/100530/0
[Application] *** Set input1/2/3 to 1054/100540/5
[Application] *** Set input1/2/3 to 1055/100550/10
[Application] *** Set input1/2/3 to 1056/100560/20
[Application] *** Set input1/2/3 to 1057/100570/40
[Application] +++ CoE event REQUESTED_UPLOAD (1) for object 0x1000.00 +++
[Application] +++ CoE event STARTING_UPLOAD (3) for object 0x1000.00 +++
[Application] +++ CoE event COMPLETED_UPLOAD (5) for object 0x1000.00 +++
[Application] +++ CoE event REQUESTED_UPLOAD (1) for object 0x1008.00 +++
[Application] +++ CoE event STARTING_UPLOAD (3) for object 0x1008.00 +++
[Application] +++ CoE event COMPLETED_UPLOAD (5) for object 0x1008.00 +++
[Application] +++ CoE event REQUESTED_UPLOAD (1) for object 0x1009.00 +++
[Application] +++ CoE event STARTING_UPLOAD (3) for object 0x1009.00 +++
[Application] +++ CoE event COMPLETED_UPLOAD (5) for object 0x1009.00 +++
......
EtherCAT Slave stack Windows installation 快速指南
安装软件
安装软件包路径\Slave_Stack_Obj\Windows\EtherCAT_SubDevice_Stack_(Obj)_Setup_1_4_6.exe 。
安装完成后,可以看到 C:\Windows\System32\ess.dll文件。
查看 C:\Program Files\esd\EtherCAT\SlaveStack_Obj 和 C:\Users\yourname\Documents\ESD\EtherCAT\SubDevice 两个目录, esd EtherCAT Slave 软件都在此两个目录中。
开发环境
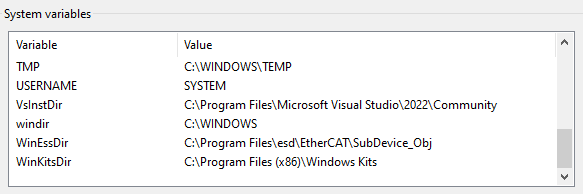
新增几个系统环境变量VsInstDir, WinEssDir, WinKitsDir,如下图。
在系统 Path 变量中增加几个目录,如下图。

此处以Visual Studio Code (VSCode) 作为 IDE 为例进行介绍。
- Configure VS Code for Microsoft C++
- 创建一个目录,名为
ess_workspace,并将C:\Users\bobtu\Documents\ESD\EtherCAT\SubDevice\apps\complex.c拷贝到此目录。 - 将如下两个文件 c_cpp_properties.json 和 tasks.json 替换或者拷贝至
.vscode目录中。 - 打开
complex.c,运行Terminal -> Run Build Task...,执行C/C++: cl.exe build active file,若有如下信息显示,则证明编译环境搭建完成。
 *  Executing task: C/C++: cl.exe build active file

Starting build...
cmd /c chcp 65001>nul && cl.exe /Zi /EHsc /nologo /FeC:\Users\bobtu\Documents\ess_workspace\essBasic\essBasic.exe C:\Users\bobtu\Documents\ess_workspace\essBasic\essBasic.c "/IC:\Program Files\esd\EtherCAT\SubDevice_Obj\include" "/IC:\Program Files (x86)\Windows Kits\10\Include\10.0.26100.0\ucrt" "/IC:\Program Files (x86)\Windows Kits\10\Include\10.0.26100.0\um" "/IC:\Program Files (x86)\Windows Kits\10\Include\10.0.26100.0\shared" "/IC:\Program Files (x86)\Microsoft Visual Studio\2022\BuildTools\VC\Tools\MSVC\14.44.35207\include" /DWINDOWS /link "C:\Program Files\esd\EtherCAT\SubDevice_Obj\bin\win64\ess.lib" "/LIBPATH:C:\Program Files (x86)\Windows Kits\10\Lib\10.0.26100.0\um\x64" "/LIBPATH:C:\Program Files (x86)\Windows Kits\10\Lib\10.0.26100.0\ucrt\x64" "/LIBPATH:C:\Program Files (x86)\Microsoft Visual Studio\2022\BuildTools\VC\Tools\MSVC\14.44.35207\lib\x64"
essBasic.c

Build finished successfully.
 *  Terminal will be reused by tasks, press any key to close it.